Science Hack Day India 2017

Post Event Report

“The best event of the year…”
“Most awaited event of the year…”
“The best event I have ever attended….”
 Scintillating, phenomenal, inspiring and full of great learning experiences filled with joy….

These are some of the words of praise that we got for SHD India 2017.

Mentors, hackers, students and parents everyone had a word of appreciation for us. These words  gave us much needed energy to keep going and made us realize that together as a team we can do so much more and so many wonderful things.

Here is what a father of  a 5 year old  and  a Free and Open Source system software hacker has to say about SHD India…
“The most memorable event I have been to and more importantly, it is an event that I would like to take my daughter to every year to show her the wonders of science from an early age, … … … and expand her horizons beyond the learning she will get from school”.

This came as  the biggest motivation and made us to dream of seeing this tiny sapling of SHD India grow into a splendid banyan tree.

After the spectacular success of the first edition of SHD India, we were determined to make it big in every way. We set goals, assembled a team, invited science lovers and hackers from all over India,  plotted and planed workshops, exhibits, art and architectural installations, science demos, making aero-models, rockets and  various other hacking activities.

We did all of this and we succeeded in making an exciting event happen. We succeeded because we had the support of almost 300 participants which includes high-school kids, science enthusiasts, hackers, mentors and our passionate volunteers.  We succeeded because of our sponsors who had faith in us and we found partners who saw their success in ours. Finally, we succeeded because the PSF (Python Software Foundation) and ICFOSS (International Center for Free and Open Source Software) supported us in a big way.

Looking Back

SHD India 2017 gathered more than 80 hacker participants and more than 200 High-school, Pre-University and Undergraduate students around the mission of getting excited and making things with science. This amazing gathering had young scientists, engineers, computer programmers, teachers, nature lovers, hackers, makers, and grass-root innovators.

We had hackers coming in from Bangalore, Delhi, Mumbai, Pune, Hyderabad, Kerala, Bengal, Himachal Pradesh and many other places in India. Our mentors represent various institutions and communities in the field of hacker/maker movement like Hillhacks, Hackbeach, Anthill Hacks, Python Pune, PyLadies Pune, PyBelgaum, DGPLUG, Reserved-bit, C-spark Research, ICFOSS etc…

One of the important component of the SHD India is the lush green uncorrupted  ambience of Sankalpbhoomi, our organizing partner. This amazing venue resembles an enchanting oasis, with a thick set of trees, sprawling lawns, and a large lagoon surrounded by picturesque expansive rock walls as backdrop,  provided most memorable experiences to all the participants.

We had set up separate spaces for workshops, exhibits, hacker-space and other activities like science demos and Architectural installations.

Highlights of the activities

Day 0

  • Setting up of stage, workshop areas and hackerspace.
  • Training volunteers for soldering – Jithin B. P. had prepared a simple PCB layout with LEDs and potentiometers for volunteers to practice soldering. These volunteers will help school students in the soldering workshops in the coming two days at the event. The RBG LED badge kit is made with sponsorship from ICFOSS, Kerala. The design of the project is open sourced and is available here.


  • Informal BoF session –  in the evening  everyone got together under one roof, and had a round of introductions followed by open discussions. After dinner, some of the hackers headed to the hackerspace (“cafeteria”) to test the Wi-Fi, and prepare for the next day’s hacks.

Day 1

  • After registration and breakfast everyone gathered at the function hall for an informal inauguration.
  • Introduction on Aeromodelling by Mr. Arjun Bilawar (retired trainer, NCC Karnataka and Goa Directorate). It had rained heavily last evening and hence a nearby playground was not suitable to demo the aeroplane. Mr. Arjun then took us to a nearby open area, and with a short runway, he was able to lift off the model plane, and flew it for few minutes to the loud cheers from the students.

  • Hacking – . Siddhesh , Sayan, SaptakFarhaan and other hackers began to build a 3D printer. Shreyas K was building an image detector to be used in his college to detect students jumping off the wall in his college premises. This was covered in the news, Tarun Bharat.
  • Few students were creating 3D artefacts using the 3D pen from reserved-bit. Nisha Poyreka
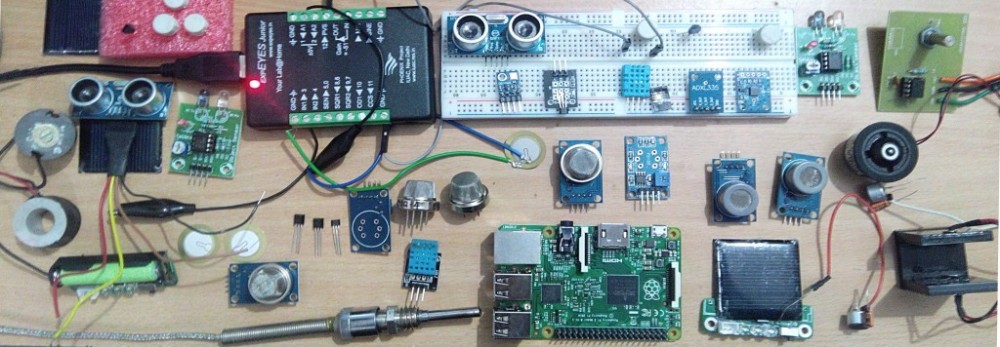
r was setting selfie photo booth,  Hitesh Dharmdasani had brought his company’s (Informant Networks) Banana Pi based-router for hacking. Vaishali Thakkar was working on the Tessel board and Rust. Shakthi Kannan was setting up the Icoboard with Raspberry Pi 3 Model B to demonstrate chip design on free and open source hardware.
  • Python powered lab tools ExpEYES and SEELablet were setup at hackerspace for demonstrating data logging and were used by students from Kerala to make a  python powered  Bat detector.
  • Biology and Geology Exhibits:  In another sit out area, students had brought specimens from the labs to showcase them.
  • Geodesic Dome : A team of architects created a geodesic dome that can be used as a makerspace. This hack activity attracted many hackers.
  • Workshops: about 150 highschool  students were divided into two groups. One group attended the soldering workshop in the function hall, and the other group participated in the science toys workshop in an open arena. The groups will swap the workshops the following day.

  • Lightning Talks : In the evening many mentors presented interesting talks on python , embedded hardware, security, product design, mechanics of a bicycle, biogas, nursary rhymes for hackers etc.

Day 2

  • Video conferencing session with Science Hack Day, San Francisco. Their event was scheduled on October 14-15, 2017 at the GitHub office. Ariel Waldman used the webcam to show around their hackerspace.
  • The students then headed to their respective soldering and science toys workshops. Some of the toys and experiments were from Arvind Gupta.
  • The hackers  continued working on their projects. All the hacks had to be completed by noon, as they have to be demoed and voted for in the evening.
  • Chemistry Demonstrations: many interesting demos were presented by chemistry teachers

  • Rocket Session : After lunch, there was a rocket session where students launched rockets prepared by experts.

  • We also had a group photo session, and headed to the function hall. All the hacks were presented to the students, and parents were also invited to attend the evening session. There was also an audience voting poll to choose their favorite science hack.

Few students and mentors volunteered to capture the moments in their camera.

SHD India 2017 Hack Awards

Following are the winning hacking teams selected by a team of judges.  The winning teams were awarded special SHD India medals and a gift from Pankh Handicrafts.

  1. Best project with  real life use case :  won by Shreyas Kapale for Captive Camera
  2. Best project with social reality and degree of completion : won by Arpita and Suyash Khanolkar team for building the bamboo geodesic dome
  3. Project that required great persistence to complete :  won by Farhaan, Saptak, Nisha and  team for installation of 3D printer
  4. Public choice award :  won by 3D scanner made by students of Jain College of Engineering

The Finances

We are happy to share a summary of our expenses.

Python is the language we love and we believe that it has the potential to change the way we learn and teach science. Therefore we tried to add the component of python in SHD India through python powered lab tools like ExpEYES and SEELablet and other code to learn activities. We are trying to have this as a regular activity at Makerspace Belgaum .  Our efforts were supported by the PSF (Python Software Foundation) in a big way through sponsorship of $1600 (₹ 1,00,575 after bank fees)

This helped us to pay partially for hackers accommodation, venue, AV rental  and to buy lab tools. These will be used at Makerspace Belgaum.

Another big support came from ICFOSS (International Centre for Free and Open Source Software) with the sponsorship of ₹ 50,000. This was used for making RBG LED badges for soldering workshop and to buy soldering tools. ICFOSS also helped us by sending Akshai M as a mentor and some useful swag for hackers.

We would like to thank our sponsors for the event without whom this conference would not have happened: PSF, ICFOSS, Reserved-bit, Vayavya Labs, Informant Networks, Polyhydron, Spica Hydraulicks, Entrepreneur’s Forum, and many other individuals who contributed in terms of time and money. Thank you for being a part of this mission to inspire our generation and create sparks for future ideas and grassroot innovations.

We accumulated a total of ₹2,77,575 in sponsorships and that was the major source of revenue for the SHD. From student registrations and volunteer contribution we collected ₹1,11,700 and from online resident hacker tickets we collected ₹57,465. Major portion of the income came from individual science enthusiasts.

The largest head for expenses was understandably the accommodation, venue, food and internet at ₹2,58,663. This took care of the accommodation in 12 cottages,conference venue, food and internet for the three days. We spent ₹53,498. on marketing, which included t-shirts, banners, certificates, badges, goodies, etc. For the equipment, science and soldering workshop kits and geodesic dome installation we spent  ₹1,03,437 and ₹20,695 on travel support for mentors. The cost for travel was lower thanks to mentors and hackers pitching in from their own pockets. The balance amount of ₹10,447 will be used for buying storage racks for Makerspace Belgaum.

To conclude…

It was a satisfying experience for all of us involved in SHD India. Everyone from the organizing team, all the volunteers and mentors put their hearts into it. Everything went smoothly, it was collaboration at its best!

Going forward we felt we should have more hacks, better preparations for involving students into  hacking activities. There is a lot of unexplored territory – artists, designers, astronomers, nature lovers, food hacks, crazy electronics and more. We wish to do more, do better…one step at a time, following the mission of Science Hack Day – “Making science disruptively accessible – empowering people from a variety of different backgrounds to explore, participate in, and build new ways of interacting with and contributing to science“.

SHD India has made us richer, not by money, but by bringing us close to passionate people from different walks of life, by givings us friends for life.


Credits: Thanks to Shakthi Kannan and Nisha Poyrekar for many of the sentences used in this post.


What Science Hackers Say about SHD India….

SHD India 2017

Photo Albums

SHD India 2016

Photo albums


FOSSASIA PSLab, GSoC-16 : Mid Term Report

I feel lucky and proud to be one among very few who get this rare opportunity of GSoC intern-ship for the third time. Thanks a billion to my source of inspiration and mentors Mario Behling and Hong Phuc Dang from FOSSASIA.

FOSSASIA has undertaken and is supporting many projects which have a potential of bringing a positive social change. ‘ExpEYES : Open Source Science Lab’ is one such project FOSSASIA is supporting since 2014. As a part of GSoC-14 and GSoC-15 we started actively developing Pocket Science Lab as  FOSSASIA’s  important project in the field of science education. The objective of this development was to make available the  most affordable, open source pocket  lab which can help  millions of students all over the world to  learn science by exploring and experimenting.

After FOSSASIA-2016 at Singapore, my mentor Mario gave  many new ideas/plans for making Fossasia Science Lab project more effective and to reach out to students in Asian region.  We started exploring possibilities of adding new tools/sensors and also  developing a new lab interface with higher capabilities to be added to FOSSASIA Science Lab.

On 23rd April 2016 the student projects were announced. I was extremely happy to see my name in the list. I was also excited to see Lorenz Gerber, with amazing profile in science research and Gi Soong Chi along with Mario Behling as my mentors.

Here is the link to details  my GSoC-16 project …….

[wmd-toggle tab_background=”#75a5ce” tab_color=”#fff” content_background=”#93e9ea” content_color=”#725d53″ border_radius=”8″ ls-id=”5768018f684ba”][wmd-toggle-tab title=”Open Source Science Experiments & Data Acquisition System for Physics Education and Research with ExpEYES – Pocket Science Lab”]Pocket Science Lab at FOSSASIA aims to develop open source hardware %26 software technology to improve science education in the developing world. The main component of PSL is ExpEYES%2C an open source hardware and software framework for developing science experiments. %28http%3A%2F%2Fexpeyes.in%29%0D%0A%0D%0AThis proposal aims to develop open science experiments for various branches of Physics. It also aims to continue improvements in the work done during my GSoC-2015 project %E2%80%9CSensor Plug-ins%2C Add-on devices and GUI Improvements for ExpEYES%E2%80%9D %28https%3A%2F%2Fgoo.gl%2F2B2CNO%29. The sensor plug-ins developed during GSoC-2015 project will be used for designing new low-cost experimental set-ups.%0D%0A%0D%0AThe new development that will be undertaken is adding wireless node module for accessing sensors with PSL. This will enable PSL to fetch data from various sensors wirelessly and it will be useful in many experiments involving oscillatory and rotatory motions. Development of low cost modules for characterization in Physics research for example – study of sound and light absorption%2C measurement of thermal conductivity etc%2C is yet another important feature of this project.%0D%0A[/wmd-toggle-tab][/wmd-toggle]

Immediately after the student project announcement I started working on the project and exploring the experiments that can be added to ExpEYES. My goal for this year’s project was to continue the work I had done during previous GSoC and to add new experiments to the ExpEYES library. I also started working on new lab interface.  Here is my work space, my GSoC Lab  🙂

kitchenlab1

Kitchen converted to GSoC-16 Lab 🙂 Linear Air track for mechanics experiments, super-critical dryer which uses PSLab for temperature control and monitoring with other instruments.

In the month of May-16, I spent few days at IUAC – Inter University Accelerator Centre, New Delhi, to work with Dr. Ajith Kumar ( Inventor of Expeyes). The time spent at IUAC was most useful as we got help and inputs from many people at IUAC and also the participant teachers of ExpEYES training programme. We designed some new experiments to be done with ExpEYES. Planned improvements in Mechanics experiments especially the experiments on linear air track. We also started working on the new lab interface . Thanks to Jithin B.P.   for helping us out with the hardware part. With the continuous collective efforts now we have a new lab interface  “PSLab : Pocket Science Lab from FOSSASIA

It was little too hectic time as I had to work for my PhD project and had to present my work before Research Review committee meetings in the last week of May and then got excessively busy with college admissions process. As a result I could not communicate much about the work I have been doing.

Here I am trying to give all the details of the equipment and the development done so far and the things planned for next couple of months…

[wmd-toggle tab_background=”#75a5ce” tab_color=”#fff” content_background=”#93e9ea” content_color=”#725d53″ border_radius=”8″ ls-id=”5768026681211″][wmd-toggle-tab title=”PSLab : Pocket Science Lab from Fossasia”]Brand new open source lab interface for science and engineering experiments from FOSSASIA.[/wmd-toggle-tab][/wmd-toggle]

with fossasia logo stickerpslabopen psl2
Size of PSLab is 62mmx78mmx13mm. The front panel will be slightly different than the one in the picture. It will have little extra portion in the top right corner to accommodative 90 degree connector pins. something like this….
pslab
We will finalize the front panel design in a week and get the panels screen printed. The sample kits will be sent to my mentors for testing and suggestions 🙂

[wmd-toggle tab_background=”#75a5ce” tab_color=”#fff” content_background=”#93e9ea” content_color=”#725d53″ border_radius=”8″ ls-id=”57682050c93a0″][wmd-toggle-tab title=” Main Features and GUI\’s developed”/][/wmd-toggle]

PSLab can function like an oscilloscope, data logger, waveform generator, frequency counter, programmable voltage source etc. It can be plugged in to USB port of PC or SBC’s like Raspberry Pi.

It has

  • 2 variable sine waves
  • 4 programmable  square wave generators
  • 3 programmable voltage sources
  • Programmable constant current source
  • 4 channels for fetching data
  • Sensor input
  • Berg Strip sockets

We are also working on to add wireless sensor interface. This will enable PSLab in accessing various sensors using wireless module.

[wmd-toggle tab_background=”#75a5ce” tab_color=”#fff” content_background=”#93e9ea” content_color=”#725d53″ border_radius=”8″ ls-id=”57682f2aacbb3″][wmd-toggle-tab title=”PSLab Code repository , Installation and Communicating with PSLab”/][/wmd-toggle]

All the programs are written in Python. PyQt is used for GUI designing and Pyqtgraph is used for plotting library.

I have created two repositories  for PSLab

: This repo hosts the python library for PSLab (Communication Library depends on python, python-serial, python-numpy)

: GUI programs and templates for various experiments. (Depends on python-pyqtgraph (>=0.9.10), python-qt4 (>=4.10), ipython(>=1.2), ipython-qtconsole(>=1.2)

To Install PSLab in Gnu/Linux

Clone both the repositories fossasia-pslab-apps and fossasia-pslab

Now, cd into the directories , and run

sudo make clean
sudo make install

Now you can run Experiments.py from terminal

Without the device connected to the pc you will first get the following flash screen.

SplashNotConnected

After clicking OK you will get the control panel with menus for Experiments, Controls, Advanced Controls and Help… ( Help files are yet to be written)

controlPanelNotConnected

Once the device is connected to the PC and program Experiments.py is run from the terminal…. one will be able to get the following….

SplashScreen

PSLab Splash Screen

#TO Do … Design new splash screen with PSLab Logo/relevant image.


controlpanel

From this control panel one can access various experiments through independent GUI’s written for each experiment.

After installing the library, you may test it using simple Python programs. If you have python-matplotlib installed, run the code listed below

# connect sine1 to CH1
 
 from pylab import *
 from PSL import sciencelab
 p = sciencelab.connect(verbose = False)  
 p.set_gain('CH1', 3)           # set input CH1 to +/-4V range
 p.set_sine1(1000)              # generate 1kHz sine wave on output W1
 t,v1 = p.capture1('CH1', 1000, 10)    # digitize CH1 1000 times, with 10 usec interval
 plot(t, v1)
 show()
 

The output of this program is here ......
 sine-plot

sine plot

[wmd-toggle tab_background=”#75a5ce” tab_color=”#fff” content_background=”#93e9ea” content_color=”#725d53″ border_radius=”8″ ls-id=”5768419680c0e”][wmd-toggle-tab title=”Various other functions with GUI\’s”/][/wmd-toggle]

Controls available with PSLab…. and various other GUI’s

sinewaveonoscilloscope

Sine wave generated using control Wave 1 and displayed using CH1

pslaboscilloscope

FOSSASIA PSLab Oscilloscope


advanced controls

Advanced Controls


logicanalyzer

FOSSASIA PSLab Logic Analyser

One of my favourite experiment Lissajous Figures has become so easy with PSLab…. 🙂

lissajous2

Lissa1


lissajous1

Lissa2


datastreaming

Data streaming

sensordataloger

Data Logger

squarewave

wirelesssensordataloger

GUI for wireless sensors …. TO DO

In addition to the above development work we also conducted  a few demonstration sessions in science and engineering colleges at Belgaum, India. The feedback from teachers and students in improving the kit  is really helpful in modifying the GUI’s for better user experience.

[wmd-toggle tab_background=”#75a5ce” tab_color=”#fff” content_background=”#93e9ea” content_color=”#725d53″ border_radius=”8″ ls-id=”57682b0deed55″][wmd-toggle-tab title=”Plan for next two months…….”/][/wmd-toggle]

  • Add new experiments to PSLab
  • Complete Voltammetry module for ExpEYES
  • Complete Unified GUI for all  Mechanics Experiments using ExpEYES
  • Documentation for PSLab

We are  getting about 25 PSLab  kits ready in the first batch by the end of this month. Thanks to funding from GSoC-15 🙂 Need to work on the PSL@Fossasia website.

Next immediate plan is to get about 100kits ready  and update the website with all the information and user manuals before FOSSASIA-17. It will be a good idea to officially launch this tool during next FOSSASIA 🙂

I am also working on a plan to reach-out to  maximum number of science and engineering students who will definitely get benefit from PSLab 🙂

GSoC Weekly Report 10

( From Monday 21st July 2014 to Sunday, 27th July 2014)

I am happy with the work that I could do this week. Planning and basic set-up of almost all planned experiments for my GSoC project is complete. Gathered the required apparatus and set-ups are ready. Still some work on python programs for these experiments and documentation is to be done. In another week I will be able do complete the work. Then I can focus on polishing the code and finalizing everything.

Things we could do this week…..

  • Completed python program for using photo-gates for time measurements in various experiments. ( Some issues like timeout error are to be solved)
  • Started working on an interesting experiment of Helmholtz Resonator.
  • Wrote a python program to  digitize sound resulted from different resonators. With this program it is possible to change the frequency of source and when it matches with the natural frequency of resonator, a loud sound is produced. Tested the code with a bottle ( which resonates at about 200 Hz) and  a test tube (which resonates at about 450 Hz).
  • Python program ( srf3.py) to fetch data from srf module  and plot graphs needed some modifications to plot velocity and acceleration graphs. Now the basic program is complete and plots position, velocity and acceleration. Velocity is calculated using numerical differentiation and acceleration is calculated as the second derivative of position with numerical methods. Wrote following code for velocity and acceleration. Committed the entire program to GIT Repo.
  • In most of the mechanics experiments we are trying to plot multiple graphs ( position, velocity and acceleration or kinetic energy and potential energy etc.)  in one figure. In the figure the axis labels of two graphs are overlapping. These labels should have some spacing between them. Studied different functions available in python. I found tight-layout() function from matplotlib to be very easy and useful. Sometimes it can happen that axis labels or titles (or sometimes even ticklabels) go outside the figure area, and are thus clipped. tight_layout() can prevent this and also adjust spacing between subplots to minimize the overlaps.
  • The experiments of resonator and resonance tube are generally performed with tuning forks. Since tuning fork produces very low intensity sound, it is not clearly audible and the frequency is fixed. therefore the length of the resonance pipe must be changed to adjust with the frequency of tuning fork. We used a speaker connected to SQR1 of ExpEYES. frequency of SQR1 can be varied till we get sound of resonance. a wide range of frequencies is available from ExpEYES therefore it is easy to do this experiment with various sizes of tubes and resonators. We used a mic to study the amplitude. Wrote a python program to change frequency of SQR1 and to plot the frequency v/s amplitude graph. The program for frequency response study of pizzo buzzer was already available. Just made few modifications required for this experiment. I did experimental trials with a measuring flask, plastic pipe, conical flask and a round bottom flask.  Resonant frequency is between 300Hz to 750 Hz which varies with length of tube and volume of resonator.

Difficulties faced and things TO DO next week….

  • I am working on smoothing the graphs using filtering techniques. Wrote a program using Savitzky-Golay filtering ( From this source). I could remove all the errors in the program but not getting the plots. Need to work on it.
  • Ultrasonic sensor giving time-out error when used with get-echo program with SQR2 and IN1. It is working fine with SQR1 and SEN. Need to solve this issue.
  • Need to write a separate GUI for time, Speed and acceleration measurements using Photo-gates.
  • Complete Coupled pendula experimental set-up and python program.
  • Continue working on documentation.


GSoC Weekly Report 4

This week ( From Monday 9th to Sunday, 15th June 2014) we really accelerated working with experiments and coding.

Constant encouragement and guidance from my mentors, Mario Behling and Dr. Ajith Kumar really helped me to keep going.

What We Could Do….

  • Attempted to use two Ultrasonic sensors simultaneously to detect position. Used two srf05 modules to plot graphs. Both the graphs were out of phase as expected. This is very much useful for momentum transfer  experiments involving collision. Uploaded the code to Github Repo.
  • Explored different methods of determining velocity and acceleration. Used the same set up of linear track in inclined position at about 45 degrees. Allowed vehicle to glide downwards and plotted position-time graph. Got straight line with positive slope as expected. For this used SRF05 module.
  • Then used photo-gate with ExpEYES kit and could make time measurements.
  • Designed a pickup device  for use with photogate. ( Thanks to Open Educational Resources on the web)
  • pickup for accelerationThis can generate a square wave as it passes through photogate. Acceleration can be determined  using the signal generated. Excited to see its working. Some proprietary closed source devices use this method……….( of course they come at a very high cost price). This will result in a very low cost setup
  • This is the photo gate used. (photo from www.expeyes.in)
  • light-barrier


  • Modified the photo-gate design  so that it will be easy to use with linear air track set-up.
  • Today tried to measure acceleration due to gravity using motion of glider on an inclined plane. Used the pickup i designed yesterday and photo-gate to measure acceleration. The results are very good and are in close agreement with theoretical calculations. For motion on an incline acceleration along the inclined plane is g’ = g sin(theta) where (theta) is the angle on inclination. wrote a small python code using time measurement functions of ExpEYES library.
  • Used these time measurement functions:
      • p.multi_r2rtime(3)  # time for 1 cycle
      • p.multi_r2rtime(3,2)  #time for  4 cycles, 2 rising edges are skipped
  • Now we can do the acceleration due to gravity measurement with two different methods
    1. By using motion sensor …. the data is recorded with uniform time intervals.
    2. By using Photo-gates …… the time intervals are not uniform. time taken for traveling different distances can be measured and data can be used to calculate acceleration.
  • Worked on  plotting 2D graphs using ‘matplotlib’ library.  Matplotlib is a python 2D plotting library which produces publication quality figures in a variety of formats and interactive environments across platforms. I found it to be a very powerful tool for teaching and learning physics.  Wrote code for plotting different graphs useful for mechanics experiments. Here are some screen shots….

ucm and shmgraph2

  • Data ( time and position) obtained from Ultrasonic sensor is stored in a file srf.dat and then plotted. I just moved a piece of paper to and fro, in-front of the sensor. Plot is reasonably good.  In another trial fetched  data from the file and plotted….matplotlib is amazing … :)

srf3graphssrfdataplot

  • Tried plotting Lissajous figures…..this code will be useful for my sound experiments……beautiful yet simple….its python… :)

liss


Difficulties Faced
  • Numerical Differentiation for calculation in mechanics
  • Acceleration Graphs  are scattered and lack accuracy in measurement.
  • Calculation of acceleration using Photo-gate and pickup device

To Do Next Week

  • Coming week I will be focusing giving finishing touch to the individual  experiments….
  • Documentation with experimental procedure for the experiments developed
  • Taking Photos/Videos of set up and also upload screen shots.
  • Develop code to Access all the experiments through single GUI
  • Finalize the codes for individual experiments on Github
  • Prepare for mid-term evaluation


here is my git activity for this week   https://github.com/wavicles/Plugins-for-ExpEYES/commits/master